
In this post I’m going over the process of increasing disk size, extending the C drive and moving the Recovery partition of a Windows Server VM in Oracle VirtualBox.
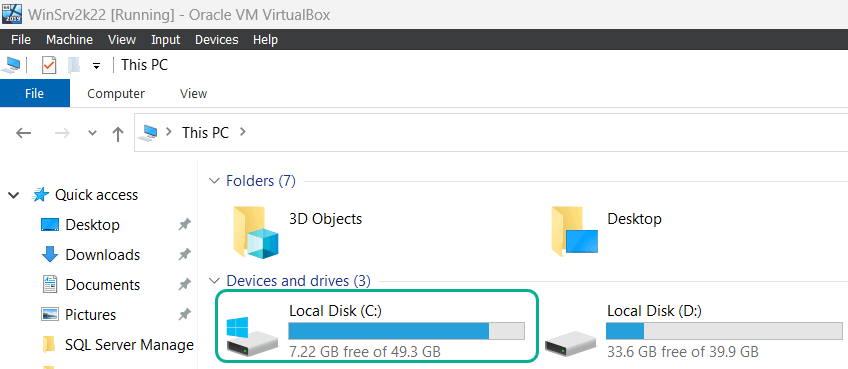
I want to install some updates on my Windows Server 2022 VM, and 7GB is pretty tight considering that I haven’t updated it in awhile, so I have to increase the size of the C drive.
Extending the size of the VDI file
First step is to shut down the VM.
Once the VM is stopped, I access its settings in Oracle VM VirtualBox Manager, go to the Storage section, and copy the full path of the VDI file that is the C drive of this VM.
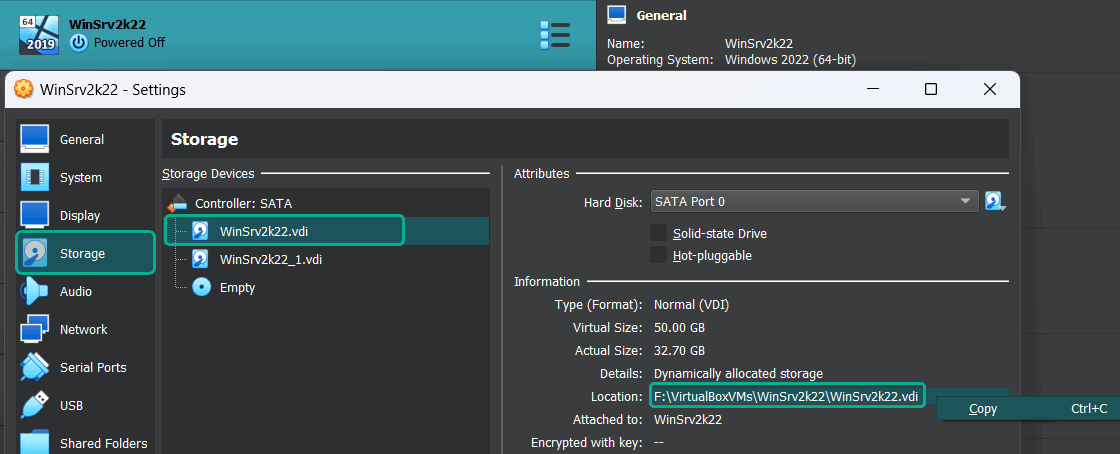
The path is in, my case, F:\VirtualBoxVMs\WinSrv2k22\WinSrv2k22.vdi.
I then open PowerShell and, to make things easier, append VirtualBox’s installation directory to the PATH environment variable.
| 1 | $Env:Path += ";C:\Program Files\Oracle\VirtualBox\" |
And then run the command to resize the F:\VirtualBoxVMs\WinSrv2k22\WinSrv2k22.vdi file to 70GB.
| 1 | VboxManage modifymedium "F:\VirtualBoxVMs\WinSrv2k22\WinSrv2k22.vdi" --resize 71680 |

Now I start the VM and check to see if the change is reflected in the size of the the disk where where the VM’s C partition resides.
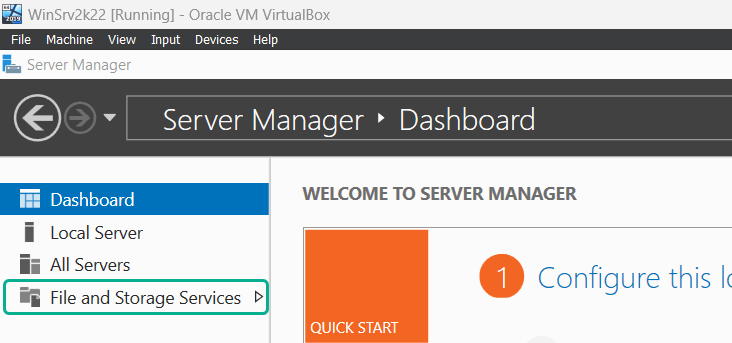
Once the VM boots up, I go into the Server Manager and access the File and Storage Services menu.
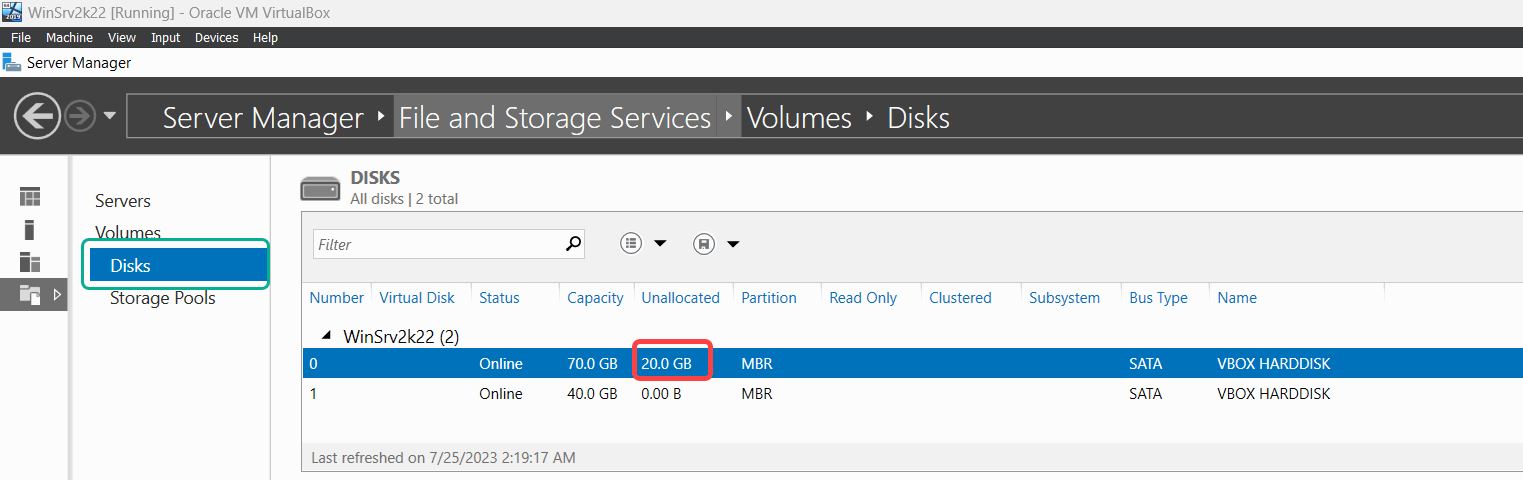
Then, I click on Disks and I can see that Disk 0, which is the C drive, has 20GB of unallocated storage space.
In the Volumes section I right click on the C drive (note that the first 2 are system reserved partitions that are used by Windows) and I click on “Extend Volume…“.
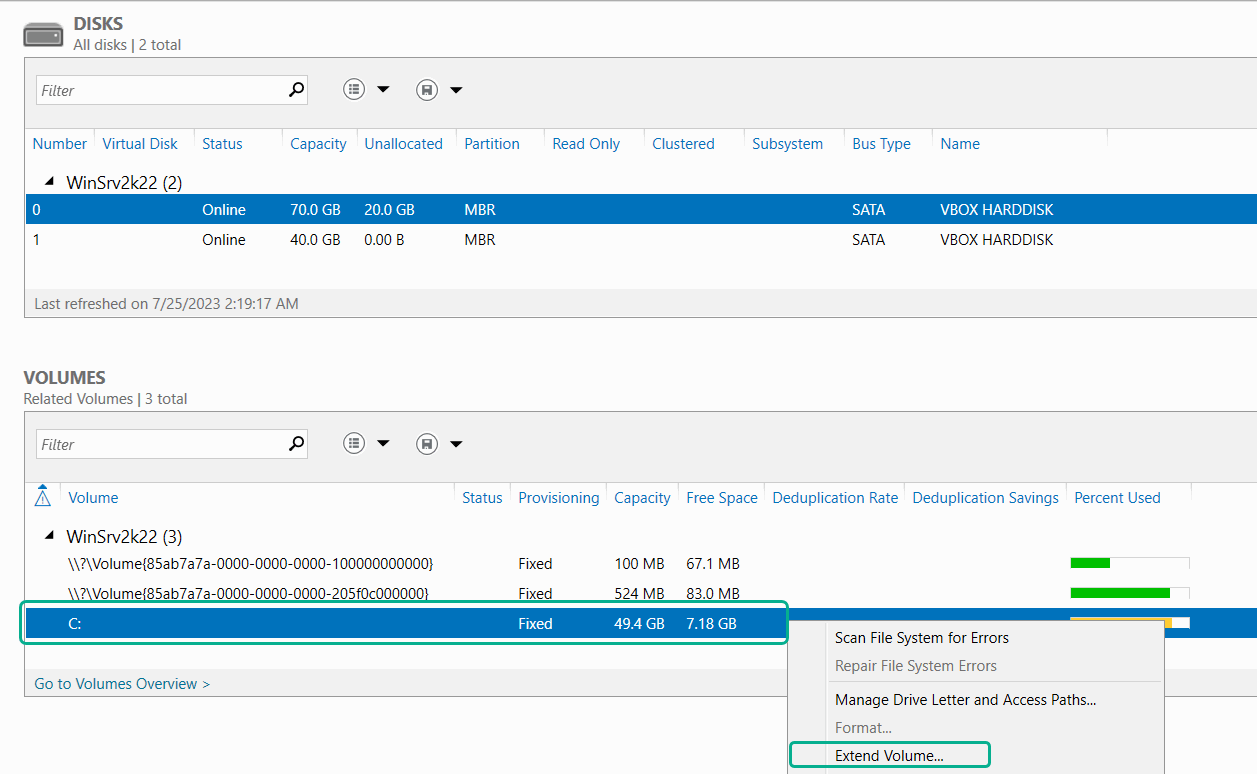
But there’s a gotcha, the extend operation fails stating that there isn’t enough space on the disk.
Looking in Computer Management reveals the issue.
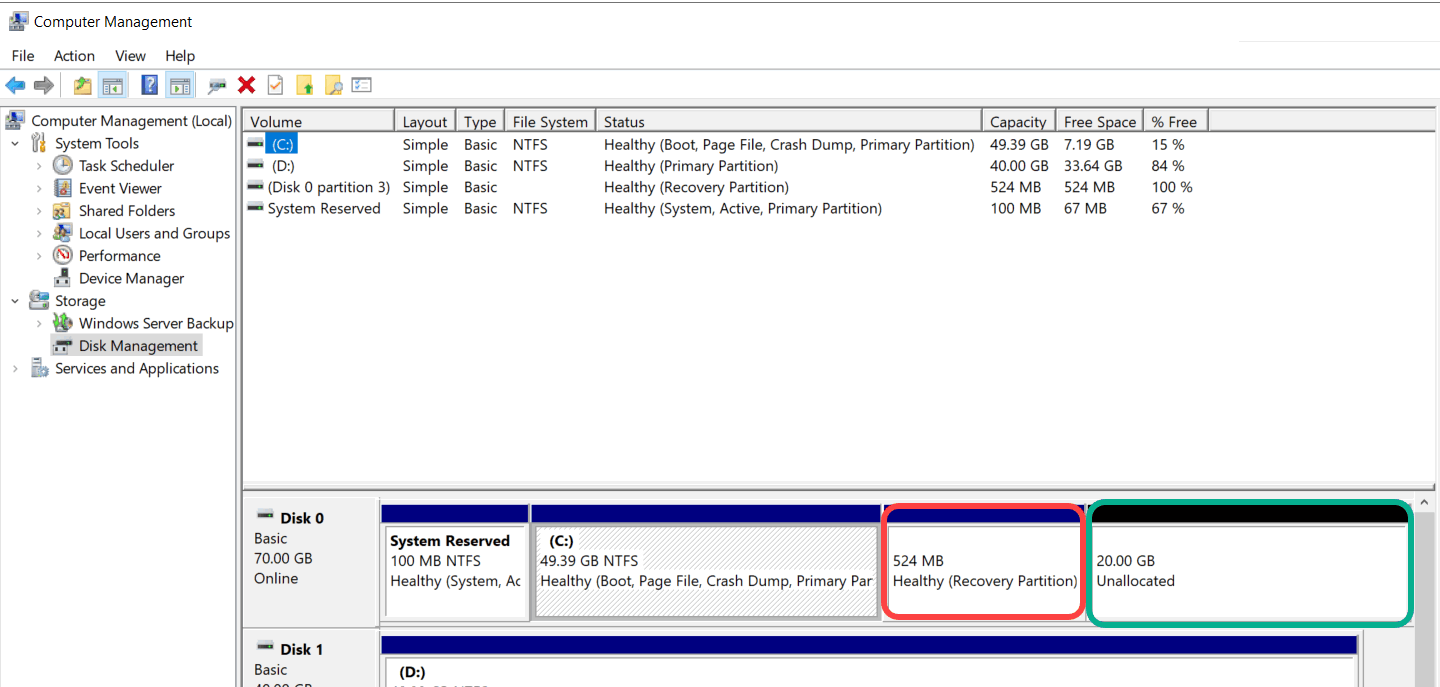
The recovery partition sits right between C and the unallocated 20GB, this blocks extending the C drive since the unallocated space must be right next to the partition that needs to be extended.
Note that this only happens in the case of the Windows partition, any other partition residing on another disk or after the Recovery partition can be extended without having to go through the following steps.
Removing the Recovery partition
Installing Windows Server Backup
First, I need to take a backup of the Recovery partition.
In order to do this I need to install Windows Server Backup (aka wbadmin).
This can be done via PowerShell (opened as admin) using the following command:
| 1 | Install-WindowsFeature Windows-Server-Backup |
This can also be done through Server Manager.
In the left hand pane select Local Server and then in the top right click on Manage and Add Roles and Features

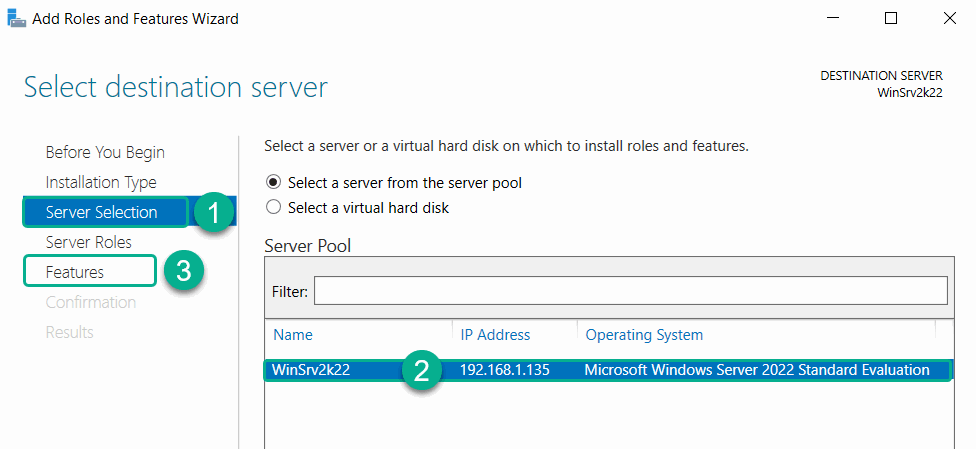
Next, in the Add Roles and Features wizard click on Server Selection, make sure the local server is selected (it normally is selected by default) and then click on Features.
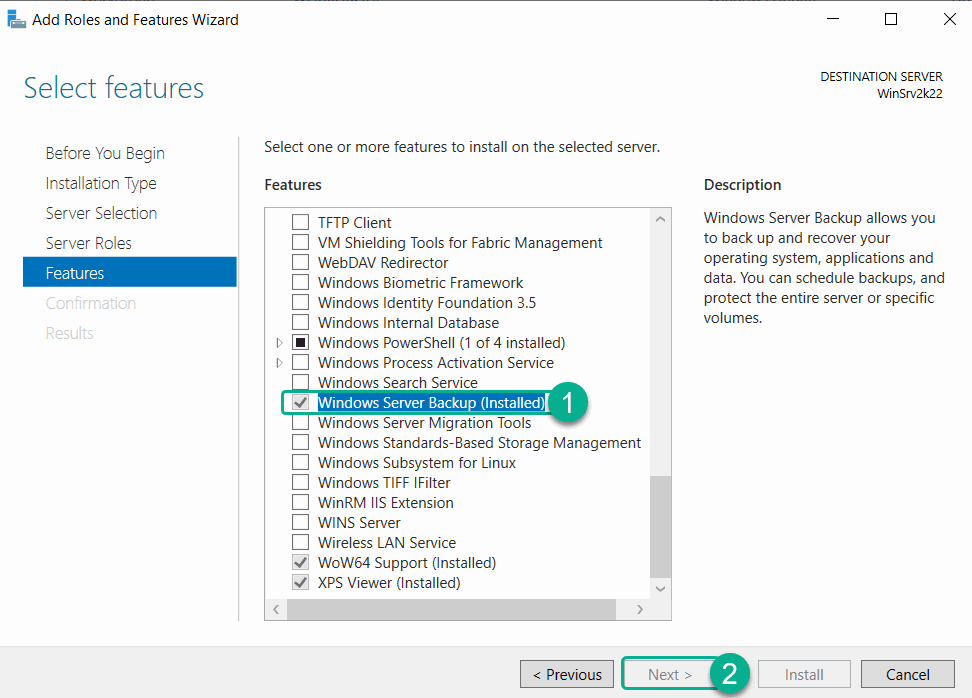
In the Features list scroll down to Windows Server Backup (note, I already have it installed in this case), check it and click on Next and in the following Confirm Installation Selections prompt click on Install.
Backing up the Recovery partition
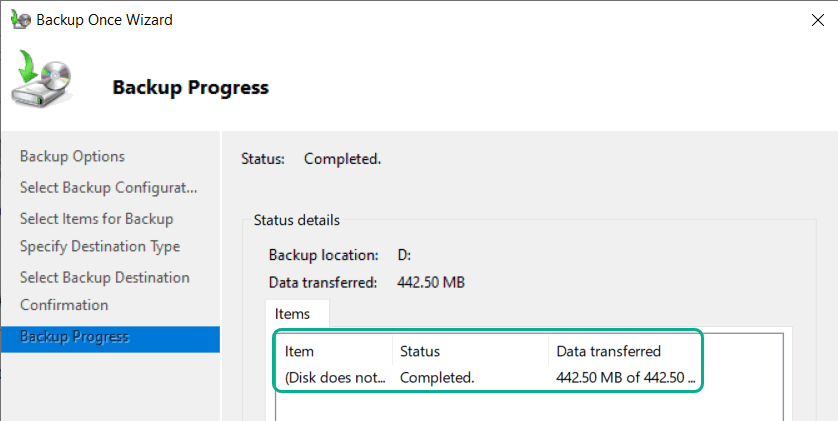
Once Windows Server Backup is installed, I proceed to backup the Recovery partition.
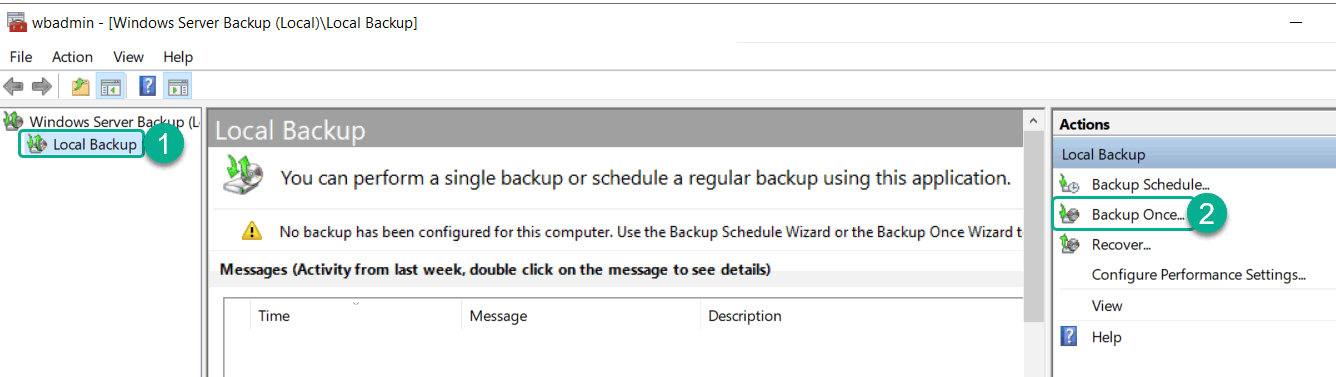
First, I open Windows Server Backup, click on Local Backup and then, in Actions, I click on Backup Once…
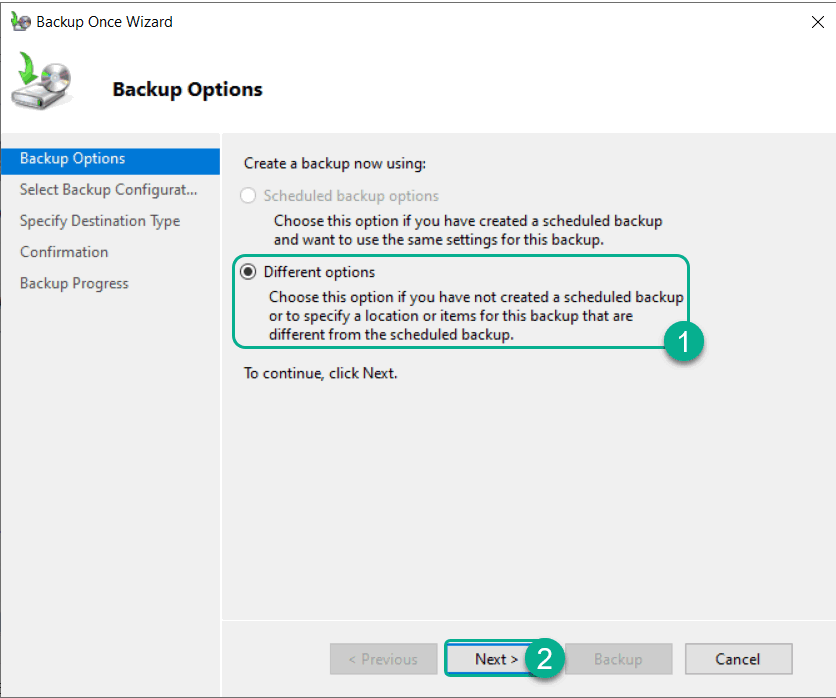
In Backup Options I select Different options and click on Next.
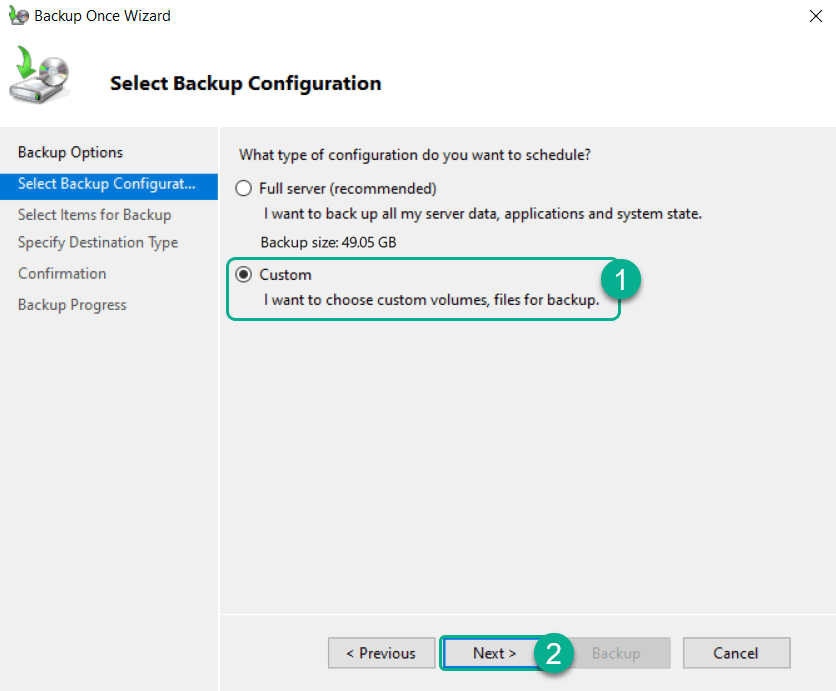
Then, in Select Backup Configuration I select Custom and click Next.
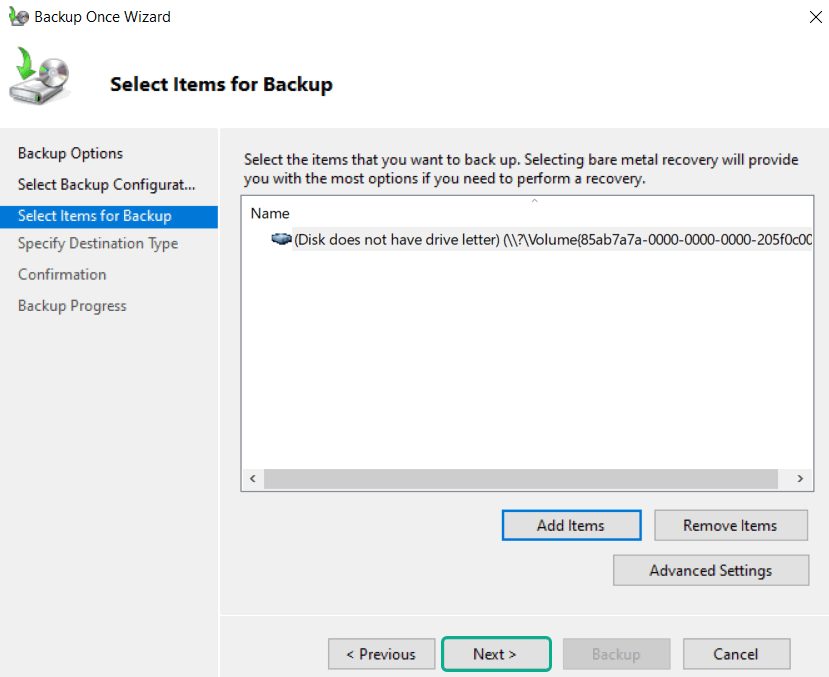
In the Select Items for Backup section, I click on Add Items and proceed to select the Recovery partition.
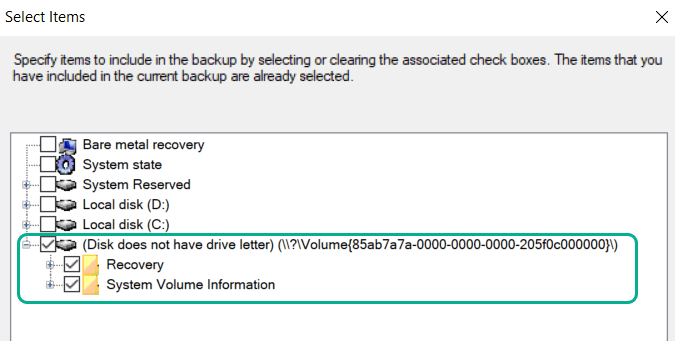
With the Recovery partition selected I click on Next.
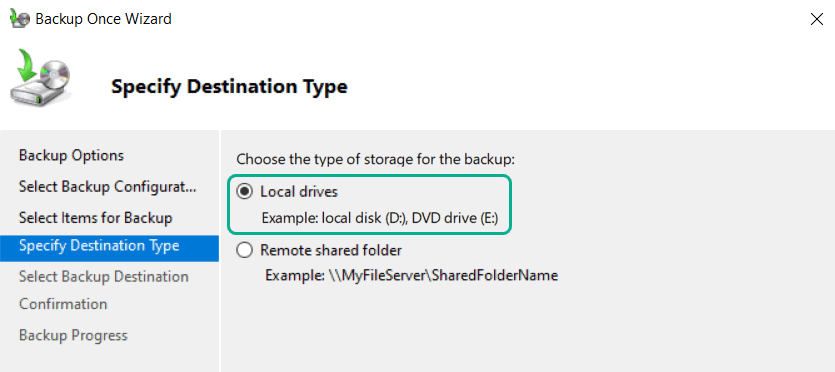
In the Specify Destination Type section I select Local Drives and click on Next.
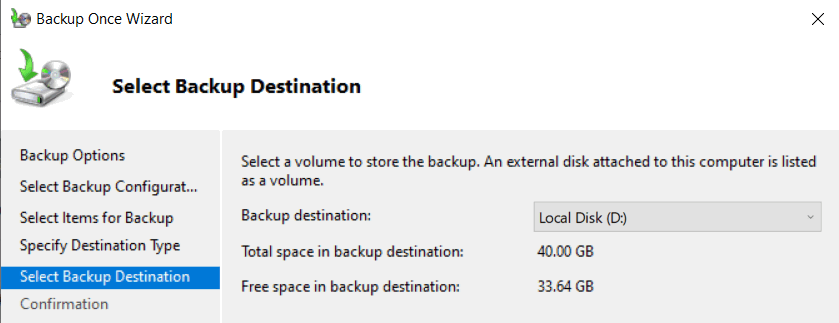
From the drop-down list in Select Backup Destination I select the drive where I want to save the backup.
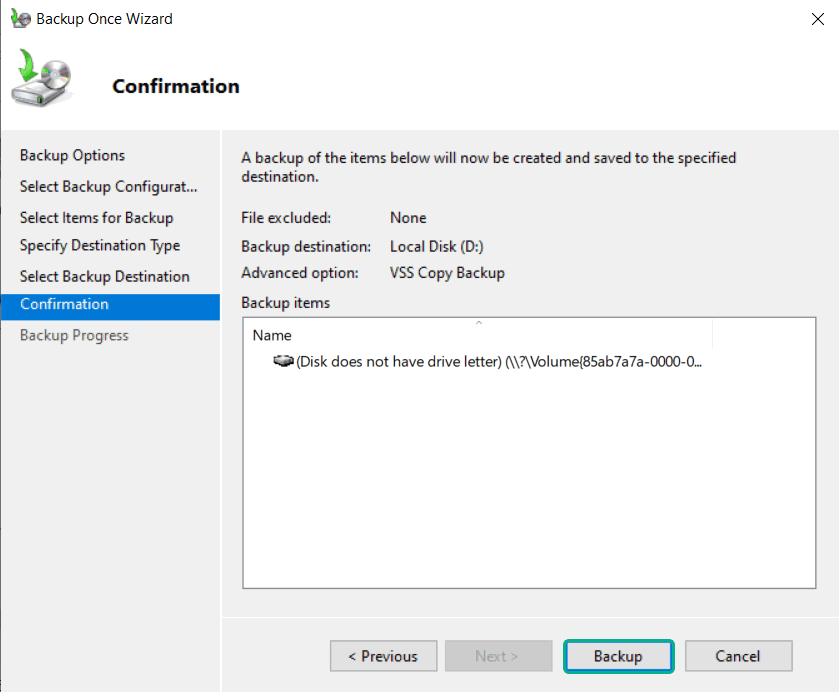
In the Confirmation section I make sure that everything looks ok, and I click on Backup.
Once the backup has finished, I can proceed to the next part of the process.
Deleting the Recovery partition
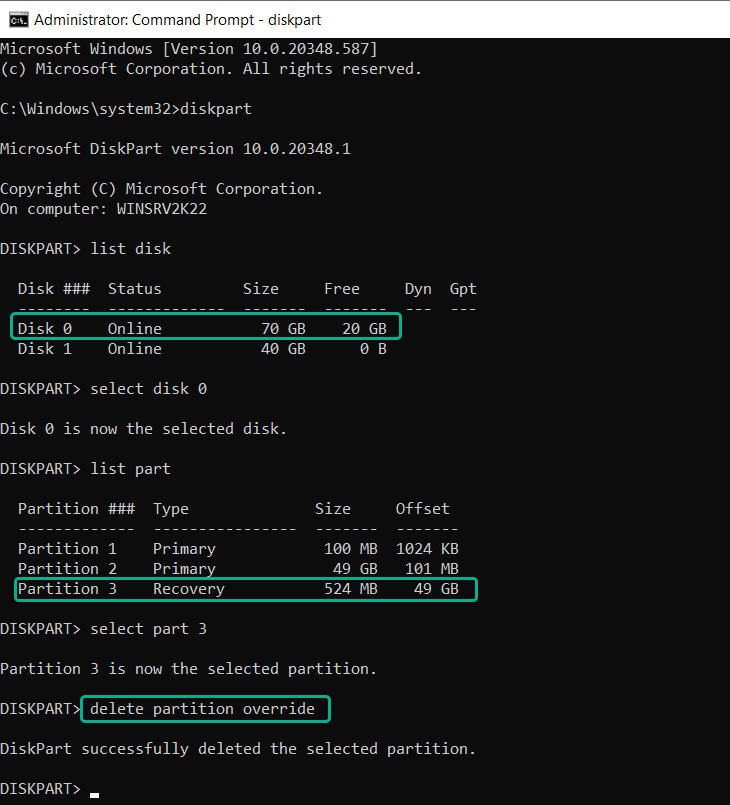
To delete the Recovery partition I open Command Prompt as administrator and run diskpart.
I list the available disks using the list disk command, then select the relevant disk (0 in my case) using select disk 0, I list the partitions using list part and select the Recovery partition with select part 3.
To delete the partition I run
| 1 | delete partition with override |
Extending the C drive
Now that the Recovery partition is gone I can go back to Computer Management.
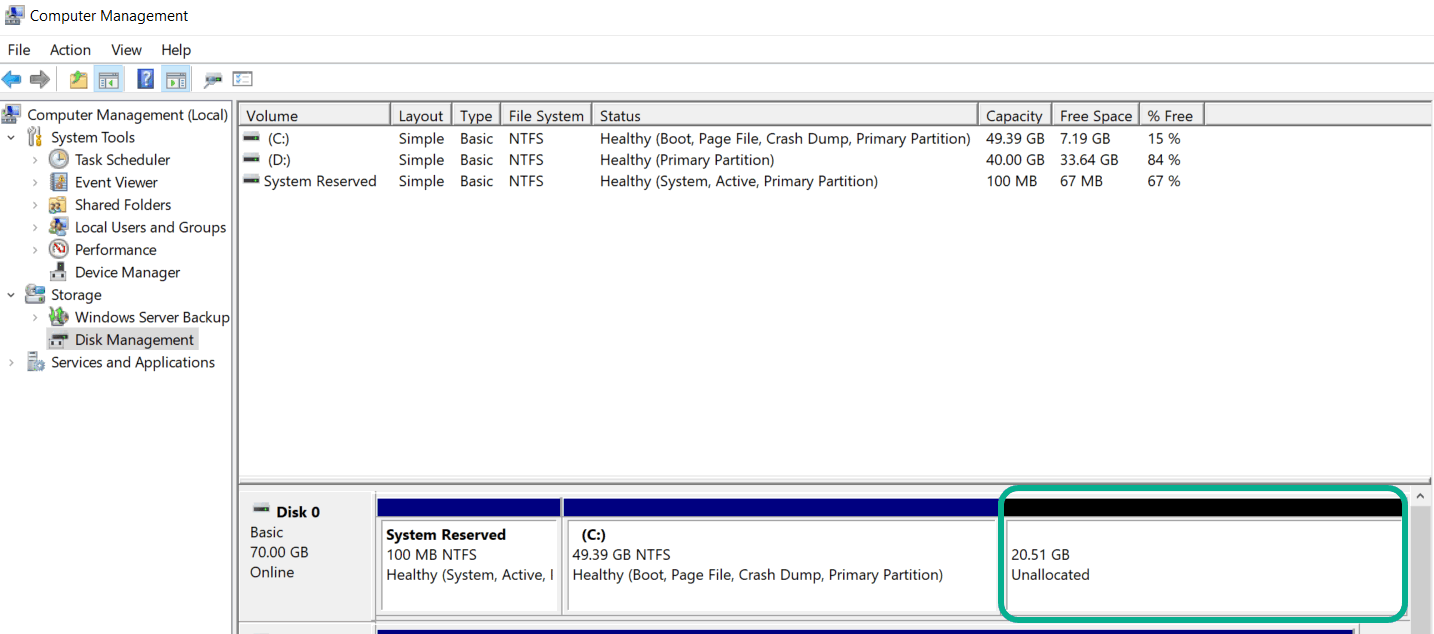
And extend the C drive (right click on the C volume and click on Extend) by 20480MB.
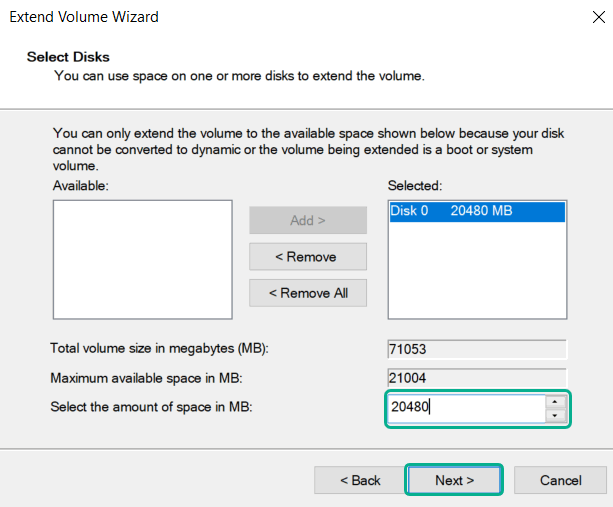
If you’re wondering how I got to 20480:
21004 (max available space in MB) – 524 (size of the original Recovery partition in MB) = 20480MB
Recreating the Recovery partition
New partition
After extending the C drive I create a new volume with the remaining unallocated space and quick format it. This will be the new Recovery partition.

Restoring the Recovery partition
To restore the previously created backup I first stop the VM, then I attach the Windows Server 2022 Evaluation Edition iso to the optical drive of the VM and start it up.
| 1 2 3 4 5 6 7 8 | #Load VirtualBOx install path into PATH $Env:Path += ";C:\Program Files\Oracle\VirtualBox\" #Attach ISO saved in Downloads folder VBoxManage storageattach WinSrv2k22 --storagectl "SATA" --port 2 --device 0 ` --type dvddrive ` --medium C:\Users\Vlad\Downloads\Windows_SERVER_2022_EVAL_x64FRE_en-us.iso #start VM VBoxManage startvm WinSrv2k22 |
Note that I did this via PowerShell in this case, if you want the GUI steps or an explanation of the commands you can check out my Setting up a Windows Server 2022 VM in VirtualBox post.
At VM startup I opt to boot from DVD when prompted.
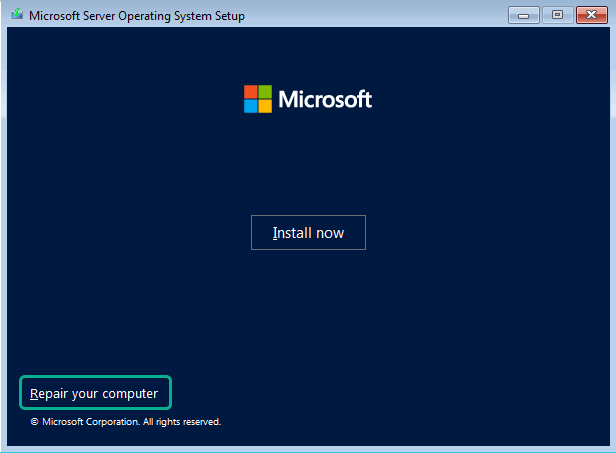
When the setup menu appears, I click on Repair your computer.
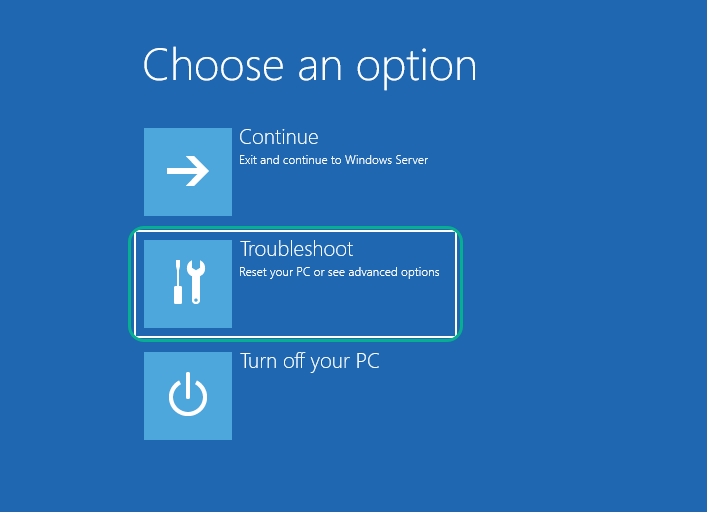
In the Choose an option menu I click on Troubleshoot.
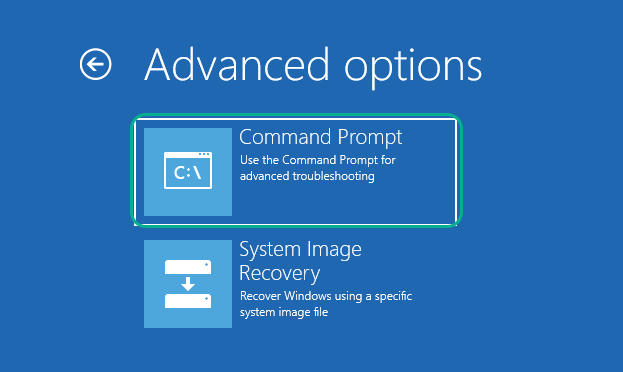
Then, in Advanced Options, I click on Command Prompt to open a cmd window.
For the restore process I’ll need a few bits of information, first is the backup’s version identifier and to get it I run:
| 1 | wbadmin get versions -backupTarget:D: |
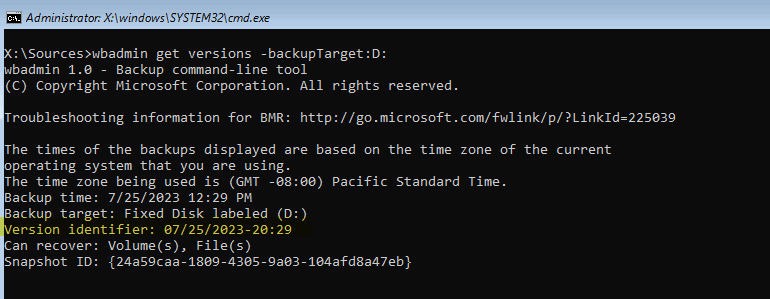
Note that I provide the drive letter where the backup is saved, in my case D, as input to the -backupTarget argument.
Now that I have the version identifier, I need the volume’s GUID. This I can get just by listing the contents of the backup directory.
| 1 | dir "D: \WindowsImageBackup\WinSrv2k22\Backup 2023-07-25 202942" |
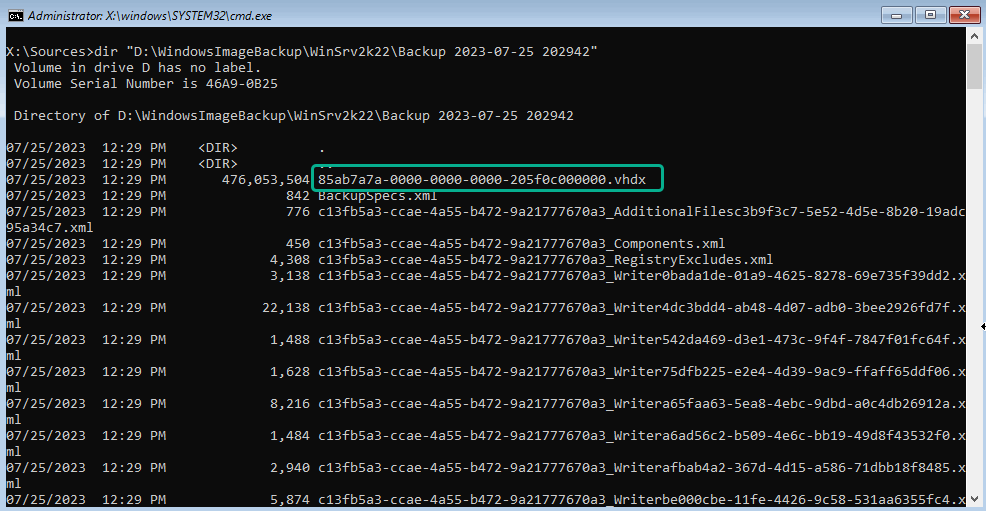
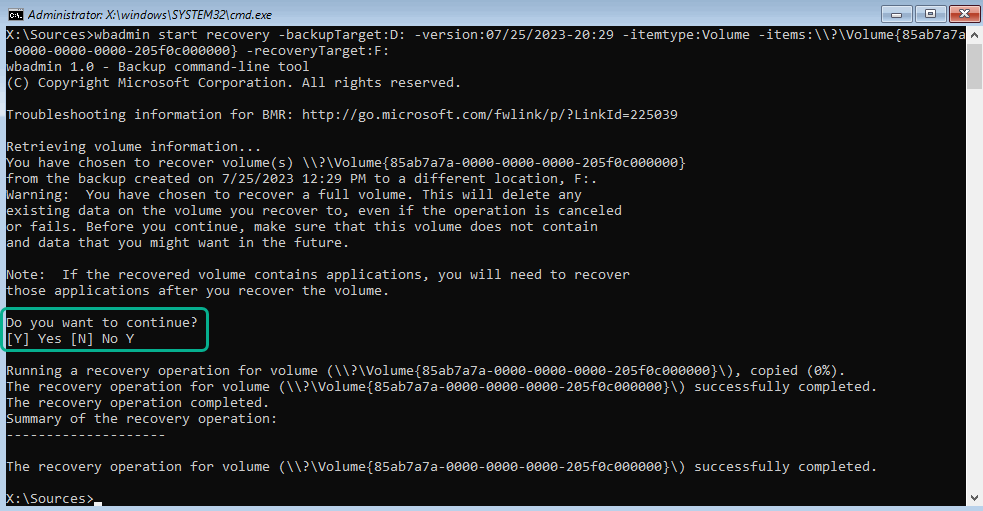
With these two pieces of information, I can now proceed with restoring the backup of the Recovery partition over the newly created empty partition using wbadmin start recovery.
| 1 | wbadmin start recovery -backupTarget:D: -version:07/26/2023-02:29 -itemtype:Volume -items:\\?\Volume{85ab7a7a-0000-0000-0000-205f0c000000}\ -recoveryTarget:F: |
I answer Y when prompted and the recovery succeeds.
Finishing up the Recovery partition
Once the restored finished, I exit cmd, shutdown the VM, detach the ISO and boot it back up.
Now, the Recovery partition looks ok, it’s just that it shows up as a normal partition.
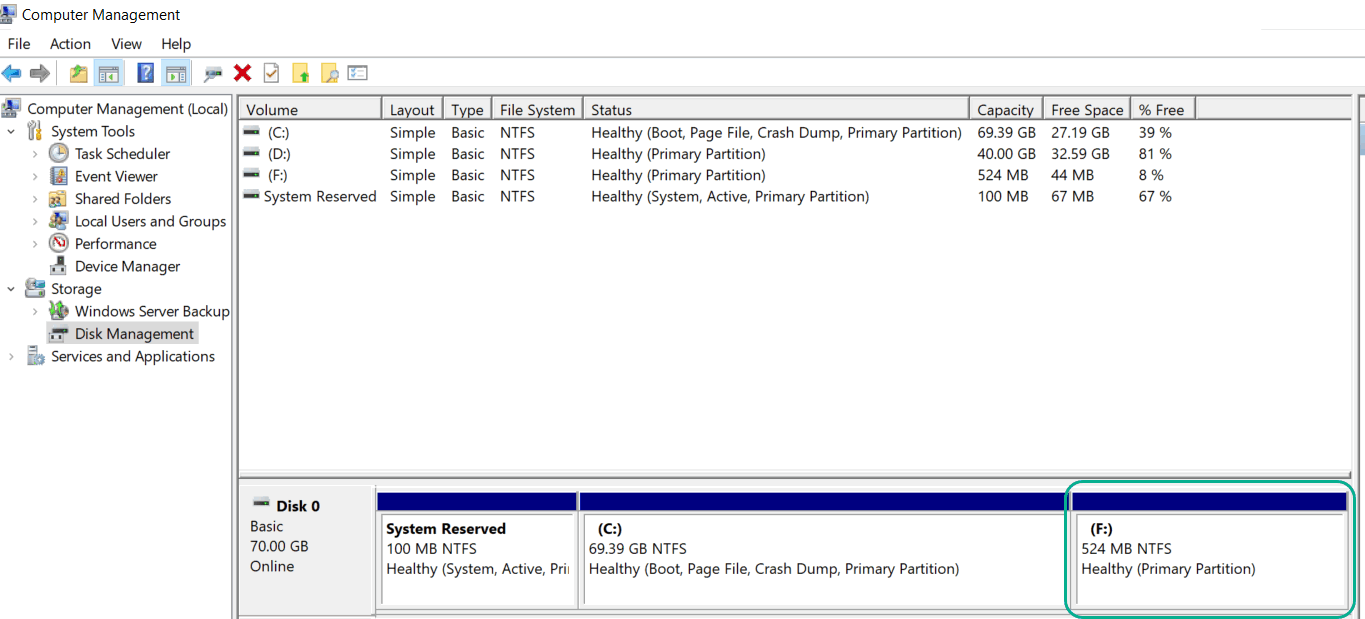
To fix this I open Command Prompt as admin and run diskpart again.
I select disk 0 and partition 3, just like earlier, and check its properties using detail part.
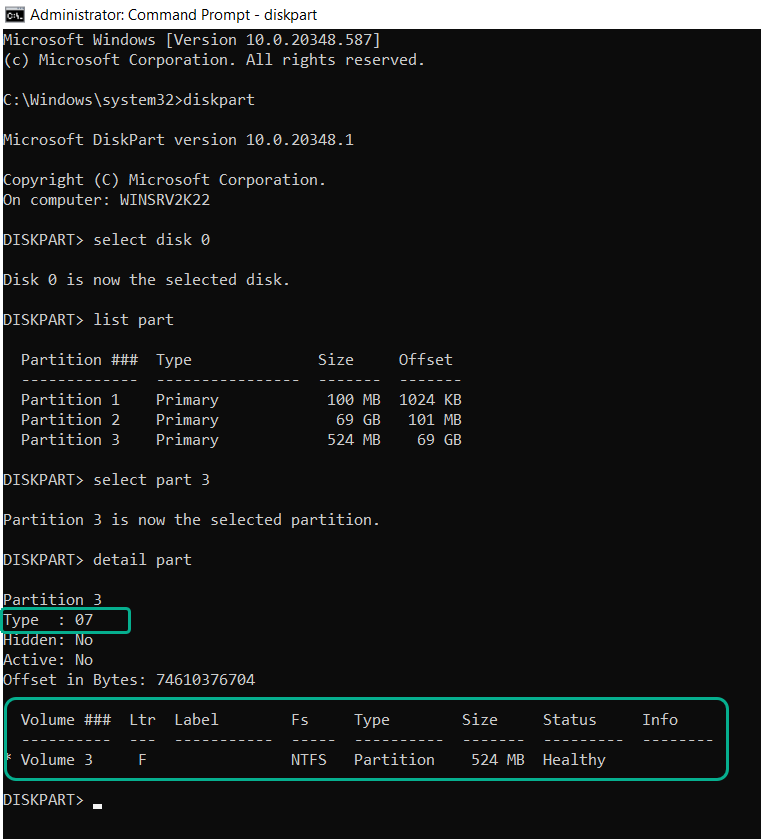
Since this is an MBR disk, to change the partition’s type I run the following command in diskpart:
| 1 | set id=27 |
And then remove its drive letter by running remove. Checking the partition’s details again shows that the type is now 27 and the partition is hidden.

Checking in Computer Management confirms that this is now the recovery partition.
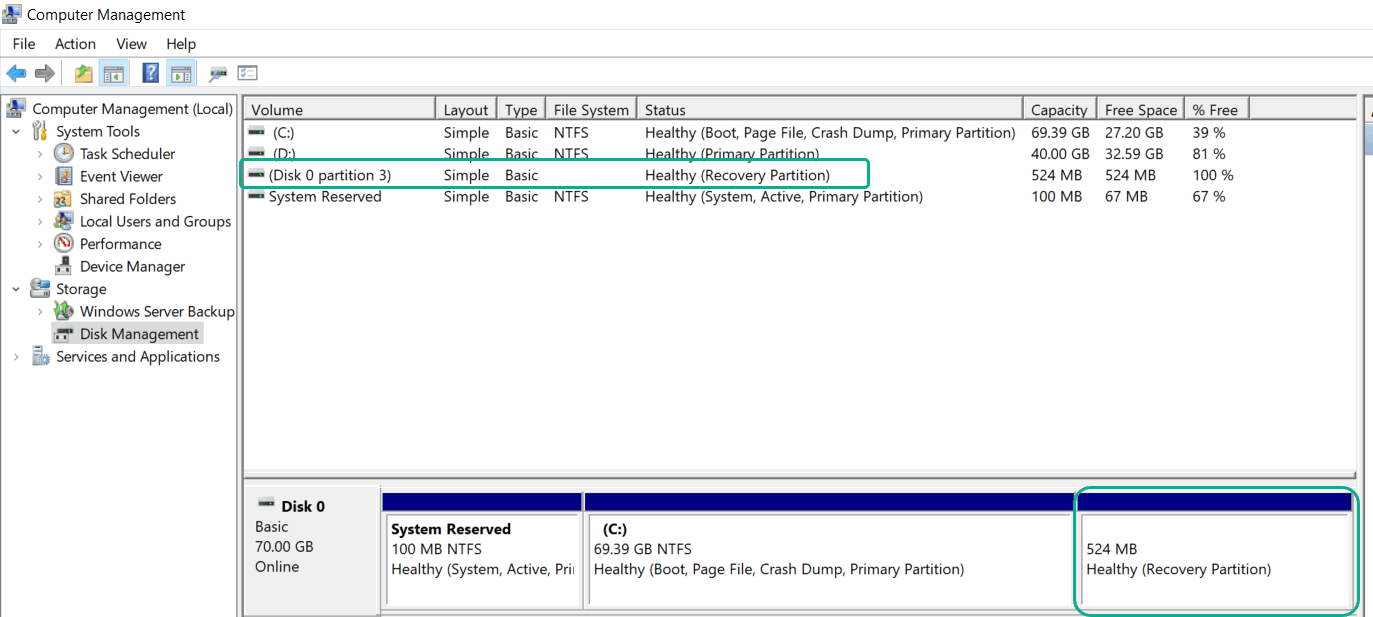
Note that if your system disk uses the GPT partition style instead of MBR, you’ll need to run the following in diskpart to convert the partition to a Recovery partition.
| 1 2 3 | set id=de94bba4-06d1-4d40-a16a-bfd50179d6ac gpt attributes=0x8000000000000001 remove |
Conclusion
This is fairly straight-forward if you want to increase the size of a non-system disk, but it gets a bit more complex when you need to extend the C drive.
Deleting the Recovery partition altogether is an option, but I don’t recommend it.