In this post I’ll outline the process of setting up an Ubuntu Server VM in Oracle VirtualBox for running SQL Server on Linux.
Prerequisites
- Oracle VirtualBox – I’m currently using version 6.1.40
- Ubuntu 20.04 – Download the Server install image, not the Desktop image
- Sufficient drive space – I set the virtual hard disk to 40GB, but YMMV depending on the size of the database(s) you plan on testing the instance with
Creating the VM
I start by building a new VM.

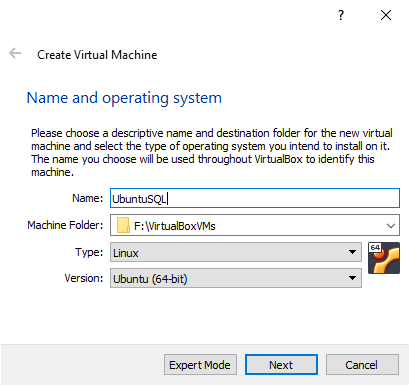
I proceed by specifying the name, destination folder, type and version of the VM.
Set the VM’s memory to something that matches my needs, 8192MB (8GB) in this case.

In the next prompt I leave “Create a virtual hard disk now.” and press “Create”. Then leave the hard disk file type as VDI (VirtualBox Disk Image) and press “Next”. And set the storage to “Dynamically allocated” before pressing “Next” again.
I set the size of the virtual disk to 40GB.

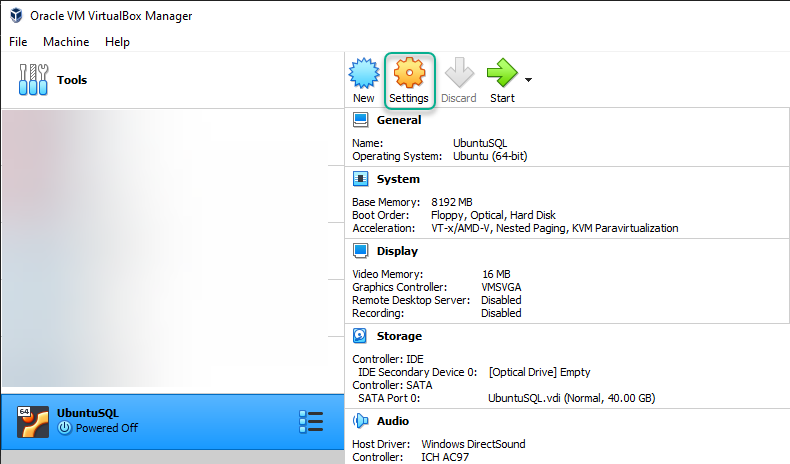
Once the “empty” VM is created, I open its settings.
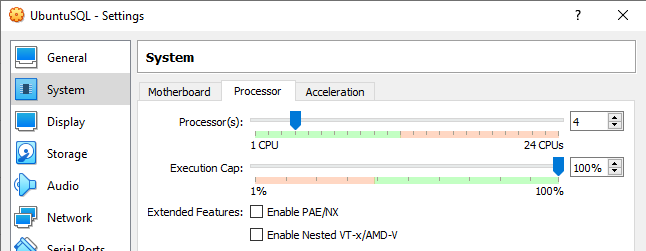
I increase the number of CPUs to 4. Note that this isn’t a recommendation, you can set the number of CPUs to whatever your VM might require.
Navigate to the “Storage” section, select the optical drive and, from the disk drop-down menu, I click on “Choose a disk file…”.

This opens up a file explorer window in which I can navigate to where the previously downloaded “ubuntu-20.04.5-live-server-amd64.iso” file is located so that I can attach it to the VM’s optical drive.

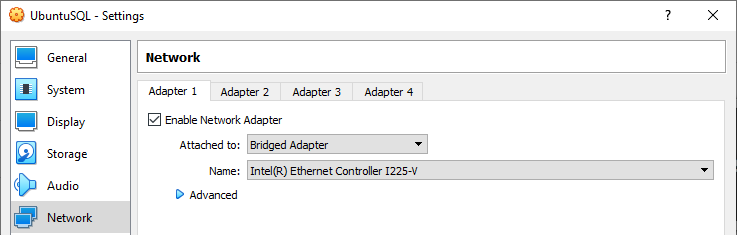
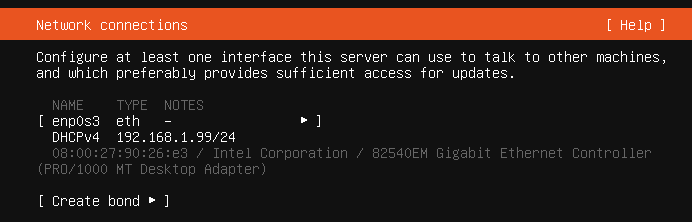
Next, I navigate to the Network section set the network as bridged since I want the VM to be accessible from the rest of the LAN.
At this point, the configuration part of the blank VM is all done. Time to start it up and proceed with installing Ubuntu.

Installing Ubuntu
Once the VM starts and boots up into the Ubuntu installer, I go through the configuration process.
First, I pick the language.

I opt to not update the installer and just proceed continue without updating.

Set the keyboard layout and variant, and then press Done.

For the “Configure proxy” and “Configure Ubuntu archive mirror” screens I just go with the defaults and press “Done”.
I make sure that Ubuntu will be using the entire disk.

Then confirm the storage configuration.

Press “Continue” when asked to confirm that I’m ok with the disk being wiped as part of the installation process.

I fill in my name, the machine name, username, and password.

I opt to install and enable SSH because I’ll be using it for the post OS install part.

In the snaps screen I select PowerShell because I also want to try it out on Linux, but it’s not a requirement for SQL Server on Linux.
After the snaps screen the actual OS installation kicks off.
Once the installation finishes, I reboot the VM by hitting Enter on “Reboot Now”.

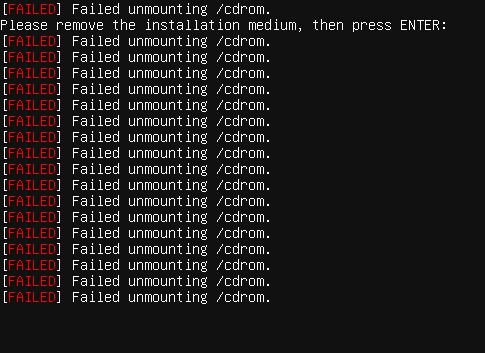
At this point, Ubuntu will throw a few errors due to VirtualBox being slower at ejecting the installation disk, so I just wait until the last “Failed unmounting /cdrom” error and then press Enter.
I then wait for the boot sequence to complete, press Enter, input my username and password, and shutdown the VM.
| 1 | sudo shutdown now |

Once the VM shuts down, I go into its settings, into the “Storage” section and this time mount the VBoxGuestAdditions.iso disk.

And start the VM in headless mode – meaning that VirtualBox won’t open up a window with the VM’s console for me to interact with. I do this because I’d rather use SSH for the next steps.

I then open Command Prompt and use SSH to connect to the VM.

Afterwards I update the OS.
Once the update finishes, I mount the disk, install the prerequisites, run the script that installs and configures the guest additions, and reboot the VM.
| 1 2 3 4 5 | sudo mkdir /media/cdrom sudo mount /dev/cdrom /media/cdrom sudo apt install -y dkms build-essential linux-headers-generic linux-headers-$(uname -r) sudo /media/cdrom/VBoxLinuxAdditions.run sudo reboot |
Installing SQL Server 2019
After the VM reboots, I reconnect to it via SSH and proceed with the SQL Server installation.
Import the public repository GPG keys.
| 1 | wget -qO- https://packages.microsoft.com/keys/microsoft.asc | sudo apt-key add - |
Register the SQL Server Ubuntu repository. This is where the install differs between 2019 and 2022.
Since I want to install SQL Server 2019 I’ll run the following command:
| 1 | sudo add-apt-repository "$(wget -qO- https://packages.microsoft.com/config/ubuntu/20.04/mssql-server-2019.list)" |
For SQL Server 2022 Preview, the following command will register the SQL Server 2022 Preview repository:
| 1 | sudo add-apt-repository "$(wget -qO- https://packages.microsoft.com/config/ubuntu/20.04/mssql-server-preview.list)" |
And then begin the SQL Server install.
| 1 | sudo apt-get update && sudo apt-get install -y mssql-server |

Once the installation completes, I run the initial configuration process to pick the edition, accept the EULA and set the SA password.
| 1 | sudo /opt/mssql/bin/mssql-conf setup |

When the initial configuration finishes and the instance starts up, I validate that SQL Server is up and running.
| 1 | systemctl status mssql-server --no-pager |

And the ultimate SQL Server instance availability test – connecting from SSMS.
